Being in an engineering friendgroup during university means that you’re gonna play Minecraft, and being the only computer science major in that friendgroup means that admin duties are going to fall on you.
Post-graduation, my friends and I have sporadically gone in and out of bouts of playing Minecraft. And lazily, I’ve never cared to figure out a better hosting solution than just paying some hosting service to have a server running for us. Most recently we were paying $30/mo for a server on a platform called Creeperhost (yeah, I know). But since our play is so sporadic, this is $30 largely wasted.
After our last hosting bill I had the motivation to change this, so I spent a weekend and some free evenings designing a decently cost-effective AWS-hosted game server. So here I just wanted to dump my thoughts about the design, the decisions I made, the cost, and how things might change in the future.
Literature review
My overall goal was to have a game server that only had to run when we were online. I did a bit of research and found two very helpful articles, so shoutout to:
- doctorray117/minecraft-ondemand
- Julien Bras: How to Run a Minecraft Server on AWS For Less Than 3 USD a Month
Doctorray117’s solution uses logs of DNS queries to automatically start the server, which allows uses to start the server by just hitting the refresh button in their server list. This is a brilliant idea and I love it, but it’s not exactly what I wanted—I was hoping to put a more personal touch on the project, so weirdly this idea was a little bit too frictionless for me. It’s a very well-thought out and cost-optimized architecture though, worth a read.
Julien’s article talks about setting up a more straightforward mechanism to start the server, using SES to start on email. In contrast, this is a bit more annoying than I would like, especially for a server that has more than one person that might want to start it. But I appreciated the simplicity and pointing me toward email in the first place, which ended up becoming part of my solution.
Quick overview
Before we get into it, here’s what the final diagram looks like:
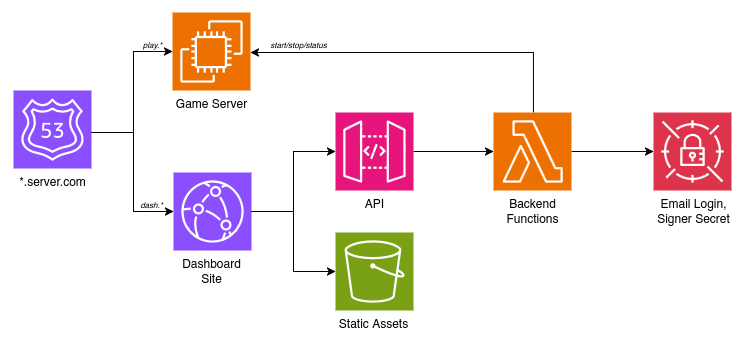
The main components are:
- play.server.com, the game server itself on an EC2
- dash.server.com, a static site on Cloudfront
- some Lambda functions behind an API Gateway that act as the backend
The dashboard has a simple email login and lets my friends start the EC2 that the server is on, which automatically starts the game server. They can also status check it, which tells them whether the EC2 + game server are running, and how many people are online.
Game server on EC2
I didn’t know what that diagram would look like in the end, but the one component I didn’t have to think about was using an EC2 to host the server. This would just be the simplest way to get something going so I could SSH in and install the server software. I spun up a new t2.micro then copied all of the locally-tested server files I had, played with the networking config to make sure it was reachable, and stole the systemd unit from Julien Bras’ article to make it start automatically when the instance starts.
That’s the boring stuff out of the way - the exciting part (for me) was figuring out how to get things to shut down automatically when no one is online. Doctorray’s article uses a separate watchdog service to monitor his Minecraft server and trigger shutdown, but there’s an even simpler approach—the instance can just hit its own power button.
Basic Linux tools make this simple—the shutdown command lets you both schedule shutdowns in the future and cancel pending shutdowns. Systemd also lets you create timers (sorry cron, just trying to have to learn as few tools as possible) so I can run a script to check every few minutes. And the mcstatus Python package lets me check the status of a running server to see how many people are online. All in all, the logic looks like this:
-- A systemd timer runs this every 5 minutes

online := number of players on localhost:25565, as reported
          by mcstatus

if server unreachable:  -- Shut down immediately if the
    run "shutdown"      -- server is down (likely crashed)
else if online == 0:    -- Schedule a shutdown 15 minutes
    run "shutdown +15"  -- from now when nobody's on
else:                   -- Cancel any scheduled shutdown if
    run "shutdown -c"   -- someone is online
This runs 5 minutes after boot then every 5 minutes after that. It’s not perfect - technically it’s possible for someone to time a few very brief logouts and accidentally not trigger a shutdown cancelation, but it’s definitely good enough for a simple script.
The first “server unreachable” case is important as well—Minecraft servers are not perfect, and sometimes they just go down. I don’t have anything yet that manually restarts the game server, the easiest way to handle this is to just shut everything down. In the future I might implement some more robust handling, but for now it’s good enough.
Authentication via email
Now a lot of that last part was written referencing a user starting/stopping the EC2. Figuring out how to let my friends do that was the next step.
The simplest idea I had was to just distribute a password to my friends and make them pinky-promise to keep it safe, and on the other end of the spectrum I did a little research into how I could integrate with an SSO provider. I wanted everything hosted on a static site with no state maintained on the backend though, which meant nothing fancy. Ultimately I took inspiration from 404’s sign-in, which is a dead simple “give us your email we’ll give you a sign-in link” scheme. There’s not even account creation or anything, you just prove you have access to an email by clicking a link and that becomes your identity.
Similarly, for my purposes it was good enough to just prove that my friends had access to an email that I knew was theirs. Here’s how that works:
- User requests a login with their email
- Backend sends an email to them with a login link. In the URL params is a JWT that expires in 10 minutes and authorizes the user to log in.
- When the user clicks the login link, a request to finalize the login is sent using the JWT from the URL. On verifying this token, a new JWT is sent that expires in 30 days and authorizes the user to use their account. This gets saved to page-local storage and the user is prompted to return to their original dashboard tab.
- Now with an authenticated JWT stored, user can send whatever requests they want.
This gives a pretty nice flow for login that is simple from the user’s perspective and mine, which is good because I didn’t want to have to write that much code. The hardest part of this process was definitely figuring out how to send an email in the first place. My first thought was AWS’s Simple Email Service (SES), but this appears to have more of a business intent than just being a Amazon-hosted email server (you have to go through a whole verification process to get your email out of the “sandbox”, which severely limits the emails you can send).
Eventually I went the extremely basic raw SMTP client route. With a Gmail account, you can set up an app password which lets you sign in over the SMTP protocol. Setting up the rest was just a matter of copy-pasting some code—there are libraries to make this easier, but Python’s standard library comes with an SMTP client. I just needed to send a link so this was good enough for me. After storing the email/password in secrets manager I called it a day, the next task was to put everything together in AWS.
Also fun fact about Google app passwords: when you copy-paste the password from the webpage, it’ll include spaces between the groups of characters (for readability?). Weirdly, you can sign in whether you leave these spaces in or not, I tried both ways on accident.
Backend on Lambdas
My backend is simple enough that everything can be hosted on Lambda functions. There’s so little logic happening that the majority of these functions are just using boto (AWS’s Python SDK, a kind of annoying library I try to use as little as I can) to call out to relevant AWS services.
One thing I don’t know enough about is how to properly package Python projects. I ended up doing a lot of testing in Lambda’s built-in web editor instead of figuring out how to run things locally. Other dependencies (mcstatus, a JWT library, and a simple utils file I created) were added as a Lambda layer (zipped code that can be added ad-hoc to any function). And this way I only needed to maintain a single script for each function instead of packaging each one individually.
Currently I have 4 functions: one for each step of authorization (sending the login link and verifying it), one to manage server state (start/stop/reboot), and one to check server status (which returns both the instance state and information about the server from mcstatus, if it’s online). Verifying the authenticated JWTs is easy, PyJWT (the library I’m using) automatically verifies expiration claims, and the rest just involves checking to make sure that the user that’s been authenticated still has credentials in the permissions file. It’s not even really worth explaining in pseudocode.
One thing that tripped me up (and caused my first user-reported error!) was that running status checks takes a surprisingly long time, longer than just sending a request to start/stop the instance. I’m guessing that’s because the EC2 is reporting a full health check, which involves a few different checks behind the scenes. I ended up having to increase the max time for the status function to run otherwise it would randomly fail.
Static dashboard
The last piece of the puzzle was actually making this something that a user could see. Frontend is unsurprisingly not my strong suit, so I ended up making something simple that I could make sense of: a terminal-inspired command prompt.
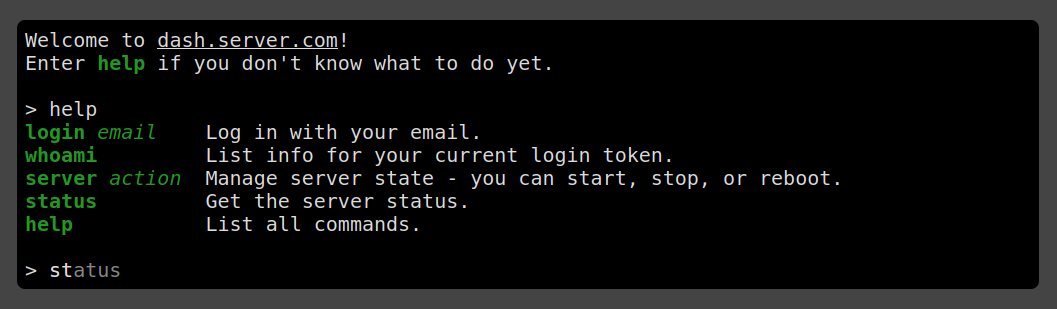
Pictured is the help command, and the autocomplete for the status command that comes up as you type it (featuring tab completion).
Running a command just makes a request to one of the backend functions, there’s not much worth going over here. Most of the CSS was done by hand but I used a tiny bit of Tachyons for some basic stuff.
All in all this was a really fun project to work on. The server’s been running for a little over a month now with pretty minor incident, the costs are a little bit higher than expected (some web security and storage costs I hadn’t factored in originally) but it’s still less than what we were paying previously, and we’re definitely getting more out of it.
Go build a server for your friends! It’s not too hard if you know how to SSH and are willing to figure out your way around the AWS console. My favorite projects are those that let me be creative in a bunch of different ways, and this gave me exactly that.